Off the Pole
Pole Conditioning Exercises: 8 Moves to Build Strength at Home
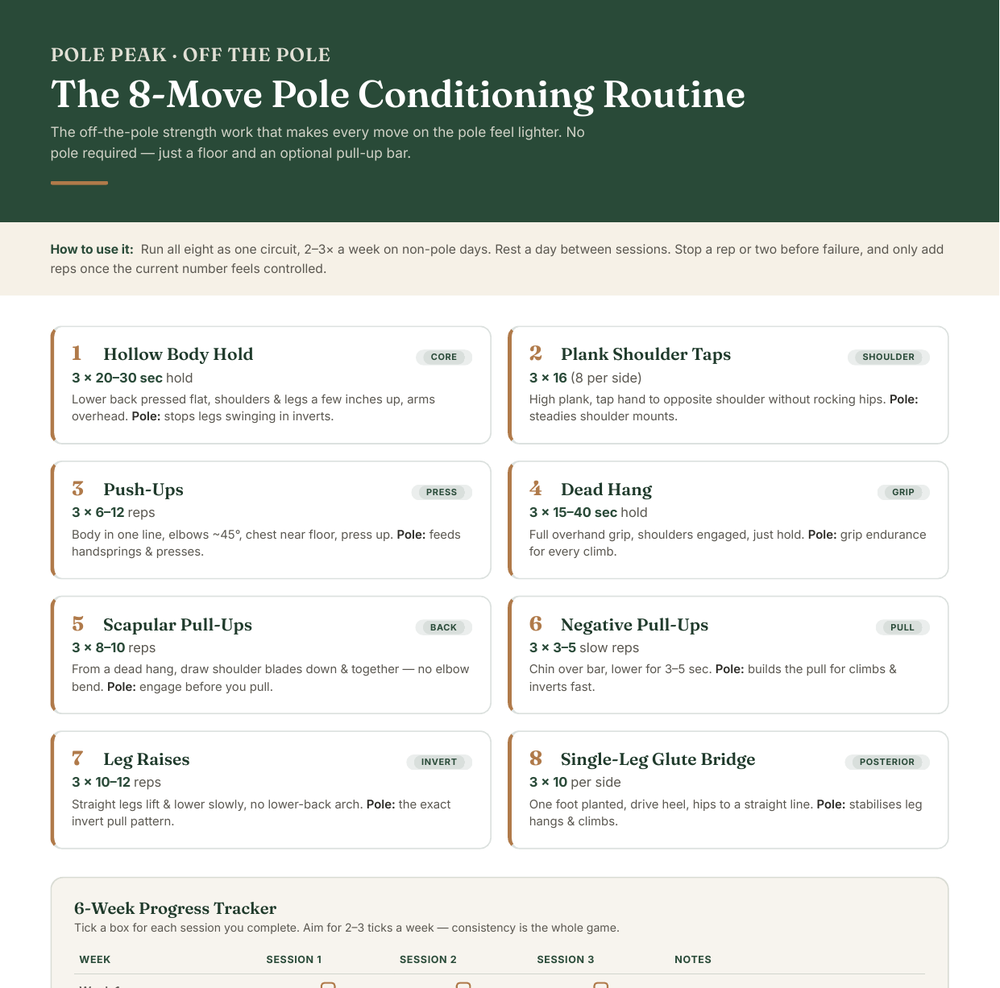
The strongest pole work isn't built on the pole — it's built on the floor between sessions. Grip that doesn't quit, a core that holds an invert, shoulders that press you up instead of shrugging into your ears: those come from conditioning. Here are eight at-home pole conditioning exercises that target exactly what the pole asks of you, with reps, regressions, and how each one carries over.
You don't need a pole for any of this. A floor, a little space, and an optional doorway pull-up bar are enough. Treat it as the quiet work that makes every move on the pole feel lighter.
How to use this routine
Run through all eight moves as a single circuit, two to three times a week, on days you're not poling hard. Rest a day or so between sessions. Quality beats quantity here — stop a rep or two before failure so your form stays clean, and add reps only once the current number feels controlled.
Before you start
Warm up for five minutes: wrist circles, shoulder rolls, a few cat-cows, and some easy glute bridges, jump rope - whatever makes you happy and warm. Cold joints and cold grip are where most home-training tweaks happen.
The 8 moves
Hollow Body Hold
CoreLie on your back, press your lower back into the floor, and lift your shoulders and legs a few inches off the ground with arms reaching overhead. Your body should look like a shallow banana.
Pole transfer: This is the exact bracing you need to keep your legs from swinging during an invert or a leg hang. A strong hollow body is the difference between flailing up and floating up.
Regression: Tuck your knees or keep arms by your sides to shorten the lever.
Progression:Try hollow body rocking if this feels too easy - look into the mirror to make sure your body stays properly aligned
3 × 20–30 sec hold
Plank Shoulder Taps
Shoulder stabilityIn a high plank with feet a little wider than hips, slowly tap one hand to the opposite shoulder without letting your hips rock. Alternate sides under control.
Pole transfer: Builds the anti-rotation stability that keeps you steady in shoulder mounts and any one-handed moment on the pole.
Regression: Drop to your knees, or just hold the plank and work the taps in later.
Progression: Use weights. Put weights on the floor next to your hands - instead of tapping your shoulder lift up the weight with one hand and put it down to the other side. Repeat with the other hand.
3 × 16 taps (8 per side)
Push-Ups
PressHands under shoulders, body in one line, lower until your chest nearly meets the floor, then press back up. Keep elbows tracking back at roughly 45 degrees, not flaring wide.
Pole transfer: The pressing strength here feeds handsprings, shoulder mounts, and any move where you push the floor or pole away from you.
Regression: Elevate your hands on a sturdy table or wall, or drop to your knees.
3 × 6–12 reps
Dead Hang
GripHang from a pull-up bar with a full overhand grip, shoulders relaxed but not collapsed, and simply hold. Breathe. Let the clock do the work.
Pole transfer: Grip endurance is the unsung hero of every climb and hold. The longer you can hang, the longer you can stay on the pole before your hands give out.
Regression: No bar? Hang a sturdy towel over a door, or do farmer-carry holds with weighted bags.
Progression: Have you tried towel hangs? If you really want a challnge hook two towels onto your bar and try hanging by only holding onto them.
3 × 15–40 sec hold
Scapular Pull-Ups
Back engagementFrom a dead hang with straight arms, pull your shoulder blades down and together to lift your body a couple of inches — no elbow bend. Lower with control.
Pole transfer: This teaches your shoulders to engage before you pull, which protects them and makes climbs and inverts feel powered rather than yanked.
Regression: Do the same shoulder-blade squeeze lying face-down on the floor (a "floor angel" pulse).
3 × 8–10 reps
Negative Pull-Ups
PullJump or step up so your chin is over the bar, then lower yourself as slowly as you can — aim for three to five seconds down. The lowering phase is where the strength is built.
Pole transfer: Pulling strength is what gets you up the pole and into inverts. Negatives build it faster than almost anything else for most polers.
Regression: Use a chair under your feet to assist, taking some load off as needed.
Progression: Slow it down! Try doing the same amount of pull ups you can but doing them incredibly slowly instead.
3 × 3–5 slow reps
Leg Raises
Invert strengthLying on your back (or hanging from the bar if you're ready), keep legs straight and lift them toward the ceiling under control, then lower slowly without letting your lower back arch.
Pole transfer: This is the precise strength pattern of pulling your legs up into an invert. Hanging leg raises also stack grip and core in one move.
Regression: Bend the knees, or raise one leg at a time.
Note: Remember to engage your shoulders! If you are sinking into your shoulders you will be using your back too much and could injure the shoulders. Aim to always engage your core and shoulders when doing these.
3 × 10–12 reps
Single-Leg Glute Bridge
Posterior chainLie on your back, one foot planted and the other leg extended. Drive through the planted heel to lift your hips into a straight line from shoulder to knee, then lower with control.
Pole transfer: Strong glutes and hamstrings stabilise climbs, leg hangs, and any move that grips the pole between your thighs — and they protect your lower back while doing it.
Regression: Use both feet for a standard glute bridge until single-leg feels stable.
3 × 10 per side
Putting it together
A full pass of all eight takes around twenty to twenty-five minutes. Push (push-ups), pull (negatives), grip (dead hang), core (hollow body, leg raises), and posterior chain (glute bridge) are all covered — the same demands the pole places on you, trained in a setting where you can actually focus on form. Log your numbers and aim to add a rep or a few seconds each week. That slow, steady progression is the whole game.
A note on consistency
You won't feel a single session change anything. Four to six weeks of showing up two or three times a week is when it clicks — your grip lasts longer, your inverts stop swinging, and moves that used to feel impossible start to feel available. Strength is built, not born.
Free printable
Get the routine as a printable PDF
The full 8-move circuit on one page, with a 6-week progress tracker. Stick it on the wall and tick off every session.
Frequently asked questions
Can I do pole conditioning without a pole?
Yes. Most pole strength is built off the pole. This whole routine uses only your bodyweight and a floor, with a doorway pull-up bar as an optional add-on for the grip and pulling moves.
How often should I do these exercises?
Two to three sessions a week is plenty alongside your pole training. Keep at least one rest day between conditioning sessions so your muscles can recover and actually adapt.
What if I can't do a pull up yet?
You don't need one to start. Scapular pull-ups, negatives, and dead hangs all build the exact strength a pull-up requires, and most people work for weeks or months on these before a full rep appears. The pulling work here is how you get there — not something you need first.
Can I just pick a few moves instead of the whole circuit?
You can, but the eight are chosen to cover push, pull, grip, core, and posterior chain — the full set of demands the pole makes. If you're trimming, keep at least one from each category rather than doubling up on what you already enjoy.
How long until conditioning improves my pole work?
Most people notice steadier grip and more controlled inverts within four to six weeks of consistent training. Strength compounds, so the carry-over only grows the longer you stay at it.
Ready to take it to the pole?
Browse the Moves List and find your next move to work toward.
Explore the Moves ListStrength is built, not born.